Staring at sightly Mount Lougheed from the summits of various different peaks in the Bow Valley and Spray Lakes corridor, I often wondered if it could be scrambled and, if so, why it wasn’t included in Alan Kane’s “Scrambles in the Canadian Rockies.” After all, Kane’s guide covers nearly every prominent peak in the area ; Mount Lougheed, with its sheer and towering block face, seemed to be a significant oversight. I soon discovered that a “scramble” route up the peak had been published in Andrew Nugara’s follow-up guide book. This route, however, is a serious undertaking (rated difficult – a climber’s scramble) and after looking at vertigo-inducing photos from So Nakagawa’s trip report, I resigned myself to the fact I would never complete such a risky ascent.
Recently, however, whispers of an easier ascent route began to reach my ears. After undertaking a little LOT OF research, I was shocked to discover that an easy scramble route did exist on this peak. My plans for the coming weekend immediately changed and I became fixated on Mount Lougheed. Thoughts of finally bagging Lougheed consumed me. Unfortunately, it was more difficult to find anyone else so consumed and, after recent reports of an aggressive bear on the nearby (and popular) Wind Tower, I did not want to tackle this peak via a remote approach alone! Most of my friends and family decided not to anger their wives by joining my little trip on short notice. My best friend Chris, however, seemed intrigued but was a little concerned that I was in mid-season shape and he had yet to bag a peak this season. Apparently, I presented some sort of a compelling argument to him on Saturday night at the Stampeders game, however, because we left Calgary early on Sunday morning under clear blue skies to tackle the massif.
.jpg)
The five peak Mount Lougheed massif as seen from Dead Man's Flats in the Bow Valley. From left to right: Wind Mountain, Lougheed III, Lougheed II (the true summit), Lougheed I and the Windtower.
.jpg)
A closer view of Lougheed II (left) and Lougheed I (right). The published Nugara scramble route up Mount Lougheed involves technical climbing and extremely exposed scrambling along the traverse between these two peaks.
.jpg)
We parked at Spencer Creek (~3 km south of the Wind Pass parking area on the Spray Lake highway) and followed a good trail up the valley on the left side of the creek. You should find the trail entering the woods about 100 feet north of Spencer Creek.
.jpg)
If you're on the correct trail, you'll come upon this beautiful mossy brook within 5 minutes of leaving your car.
.jpg)
The picturesque cirque at the headwaters of Spencer Creek provides access to steep scree slopes which, in turn, lead to the summit of Mount Lougheed. We arrived at the cirque about an hour after leaving the car.
.jpg)
The walls of Lougheed II still look imposing from the cirque.
.jpg)
Chris avoids getting his feet wet in Spencer Creek - more of a trickle at this point.
.jpg)
Taking a quick water break under the towering north face of Mount Sparrowhawk before leaving the cozy confines of the cirque.
.jpg)
Grassy slopes at the south-facing base of Lougheed II provide the start of our ascent route. We went straight up the grass between the two drainages pictured here.
.jpg)
Looking towards Lougheed III from the top of the grass slope. Lougheed II (the true summit) and our ascent route lie to the left of this photo.
.jpg)
Waterfalls cascading down between Lougheed II and Lougheed III.
.jpg)
That way! Our route goes straight up Lougheed II's obvious scree cone. The scree was reasonably solid and not as awful as it looked to ascend.
.jpg)
Chris slogging up the scree. 1400 vertical meters of scree is the perfect way to kick off your hiking season, right Chris?
.jpg)
At the top of the scree cone, a seasonal waterfall and rock band block further progress, however, the waterfall can be skirted on easy terrain to the climber's left after which a notch on the right provides access to Lougheed's upper slopes beyond the rock band.
.jpg)
Ribbon Peak comes into view beyond the Wind Mountain - Sparrowhawk col as we gain elevation.
.jpg)
Mount Sparrowhawk dominates the view on ascent for some time.
.jpg)
Just above the seasonal waterfall, the notch (right) which breaks through the rock band and onto the upper slopes becomes obvious. The large cairn made it easy to find the same notch again on descent.
.jpg)
A little hands-on scrambling for Chris.
.jpg)
Great views of Wind Mountain, the eastern-most peak of the Lougheed massif.
.jpg)
The upper slopes above the notch. Follow trails through the scree until you're above the water trickles and then cross the scree slope below slabs (trail) to gain the right-hand skyline ridge. Use this ridge to grovel your way to the top!
.jpg)
Respite from the scree!
.jpg)
Improving views of the Spray Lakes valley - Mount Assiniboine comes into view in the distance.
.jpg)
Groveling up the final scree on the skyline ridge. Lougheed III and Wind Mountain come back into view. Orange-colored Mount Allan beyond.
.jpg)
At last! Great views of Spray Lakes from Lougheed II's surprisingly broad summit ridge.
.jpg)
Almost there!
.jpg)
Chris' first summit of the year: Lougheed II (3107 m).
.jpg)
Lougheed I is slightly lower (3080 m) but significantly more imposing than Lougheed II (3107 m) and dominates the view from the summit. Here you can see the Nugara suicidal route between the two peaks.
.jpg)
The north face of Mount Sparrowhawk dominates the view to the south. Further beyond, you can see the Opal Range (left), Mount Bogart, a distant Mount Joffre (center), Mount Sir Douglas, Mount Bridwood and Mount Smuts (right).
.jpg)
The greener confines of the Bow Valley to the north.
.jpg)
Spray Lake bracketed by the Goat Range (left) and the Big Sister (right) to the west.
.jpg)
Fine company on a fine summit!
.jpg)
The beautiful Mounts Eon, Aye and Assiniboine beyond Mount Nestor.
.jpg)
The always sexy Assiniboine and Lunette "Peak".
.jpg)
Lougheed III and Wind Mountain. We contemplated the two'fer to Lougheed III but decided that we'd had enough scree for one day already!
.jpg)
Damn kids and their phones.
.jpg)
Tough nut to crack.
.jpg)
Adding my name to the impressive roster of scramblers listed in the Mount Lougheed register.
.jpg)
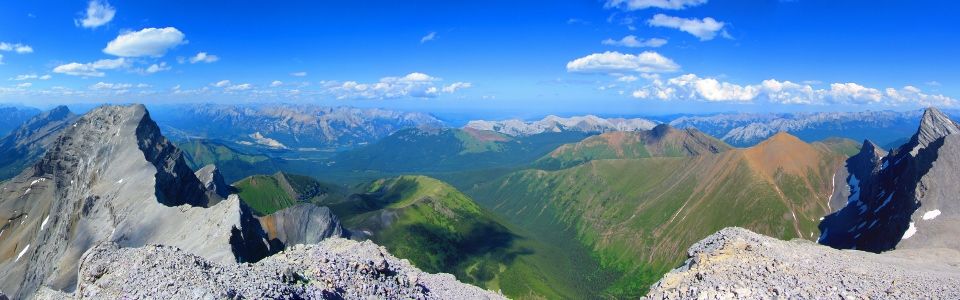
Panorama to the north. From left to right: Spray Lake, Goatview Peak, Big Sister, Lougheed I, Grotto Mountain, Pigeon Mountain, Doorjamb Mountain, Mount McGillivray, Skogan Peak, Mount Lorette, Mount Baldy, Midnight Peak, Mount Collembola, Mount Allan, Wind Mountain and Lougheed III. Click to see larger.
.jpg)
In case there was any doubt, Lougheed II is officially the true summit.
.jpg)
Summit panorama to the south-east. From left to right: Mount Allan, Wind Mountain, Lougheed III, Mount Kidd, Ribbon Peak, Mount Kidd South Summit, Mount Bogart, Mount Joffre (distant) Mount Sparrowhawk, The Tower, Mount Sir Douglas (distant), Mount Engadine, Mount Birdwood (distant) Buller Mountain, Mount Smuts, Spray Lake, Christopher, Mount Alcantara (distant), Mount Nestor, Mount Eon (distant), Mount Aye (distant), Mount Assiniboine (distant) and Old Goat Mountain. Click to see larger.
.jpg)
Mount Bogart beyond Mount Sparrowhawk's sheer north face.
.jpg)
Canmore far below the airy scramble route between Lougheed I and II.
.jpg)
Mount Kidd's north (left) and south (right) summits with pointy Ribbon Peak in between.
.jpg)
A distant Mount Joffre. The craggy summit of the Fortress can be seen in the foreground.
.jpg)
Grotto Mountain directly across the Bow Valley. Mount Aylmer is one of the highest peaks in the front ranges and can be seen as the prominent point on the far left.
.jpg)
The evil Lady (MacDonald) who keeps foiling my attempts to mount her. Lady MacDonald forms an exposed connecting ridge with the taller Mount Charles Stewart behind.
.jpg)
Green valleys and prairies to the east.
.jpg)
Yamnuska beyond Doorjamb Mountain and Loder Peak at the edge of the prairies.
.jpg)
Mounts Collembola and Allan at the foot of Wind Mountain. With the zoom on my camera taxed to its limit, I was able to make out people on the summit of Mount Allan!
.jpg)
Hero shot.
.jpg)
Mounts Rundle and Cascade over Banff to the west.
.jpg)
Time to start the long scree down!
.jpg)
Goats!
.jpg)
Baby Breezy Goat.
.jpg)
Enjoying some company back down in the scenic cirque.
.jpg)
.jpg)