Over the years, Aurore has joined me on a lot of scrambles. While the outings have almost always been scenic (minus that one whiteout on Grizzly Peak), many of them have left her sore and hobbling for some time afterwards. Despite all the “quality suffering” that I’ve put her through, she just keeps coming back for more (some people just don’t learn)!
My latest attempt to scare her off involved an ascent of Mount Bell which is strategically located between Banff, Lake Louise and Kootenay. As per usual, the day would involve a healthy serving of masochism: nearly 20 km round trip with an advertised elevation gain of 1500 vertical meters. While Kane recommends approaching Mount Bell via Taylor Lake, we opted to take the shorter, but less scenic, Boom Lake approach (after all, the day promised to be long enough already). While the Taylor Lake trailhead is located in the Bow Valley, the Boom Lake trail begins moments from the continental divide and nearly 300 m higher; this provided some added incentive to approach via Boom Lake since we could let the car take care of those 300 m for us! As a result, the actual elevation gain for Mount Bell (via Boom Lake) is closer to 1200 vertical meters.
.jpg)
After arriving at the popular trailhead, our day started as it would end: with an uninspiring 5 km trudge through the view-less forest. Although the hike was dull, the time passed quickly as we caught up on gossip. After about an hour, the monotony of the trail was broken by the spectacular shoreline view from Boom Lake. Cameras were quickly unsheathed and we proceeded to consume a substantial amount of digital memory documenting the stunning reflections of glacier-crowned peaks in the cerulean blue water.
.jpg)
After a satisfying break at Boom Lake, we proceeded across a boulder field on the right-hand shore, through trees to a second boulder field (complete with small pond) at the base of a relatively open avalanche gully. Although steep, the gully provides easy access to the upper slopes Mount Bell; the footing is solid (great for ascent, awful for descent) and a faint trail allowed us to avoid any and all bushwhacking.
.jpg)
Higher up, the gully splits. Knowing that we had to make our way left towards an unseen col, we took the left-hand branch and began to seriously side-hill once above the tree line. Although it was tempting to continue straight up, we knew (thanks to the mistakes of others) that this would result in us having to lose hard-earned elevation to reach the col. With a little help from my GPS and a lot of side-hilling, we actually managed to gain the ridge very near the col and only had to descend about 20 m to reach it.
.jpg)
Nobody likes side-hilling but with a panorama like this it’s not so bad! Click to see larger.
.jpg)
Aurore grovelling up the 600 vertical meter gully. With amazing views of Boom Lake at the base of Boom Mountain’s sheer north face, however, this suffering is of the highest quality.
.jpg)
A closer look at the natural log boom for which Boom Lake was named.
.jpg)
Despite Aurore’s insistence that the gully was never-ending, it did (eventually) lead to the ridge crest. From here, we were finally able to see Mount Bell which had previously been obscured by terrain; its summit: still a long ways off!
.jpg)
One of the finer panoramas in the Canadian Rockies! With views like this, it was tempting to skip the usual masochism and spend the afternoon relaxing at the col (but then what fun would that be?)! Click to see larger.
.jpg)
Looking down the other side of the col towards the alternate Taylor Lake approach.
.jpg)
A comfortable (?) seat for lunch.
.jpg)
Time to get back to business! After an enjoyable lunch break near the col, we resumed our ascent. Although it was tempting to ascend the blocky terrain on the ridge crest directly, we opted to stay on less technical terrain to the climber’s left. This involved crossing a couple of scree gullies like the one pictured here before eventually ascending Bell’s more open (and slightly more solid) southwest scree slopes.
.jpg)
Aurore works her way up the blocky terrain on the edge of one of the scree gullies. Many of the large quartzite blocks which we scrambled over were loose. A helmet is definitely a good idea on Mount Bell!
.jpg)
High up on Mount Bell’s open but loose southwest slopes, a pristine hanging valley comes into view above Boom Lake. Both the grandeur of the scenery and the grandeur of the talus slope dwarf Aurore. Can you spot her? Click to see larger.
.jpg)
Another group descends past the first of the pinnacles that Kane mentions. These can be skirted either to the left or to the right (both options involve piles of awful loose scree).
.jpg)
By-passing a second set of pinnacles (these should be by-passed on the climber's left): as we neared the summit, the view of the continental divide and more distant Vermilion Range improves as the ascent angle finally relents.
.jpg)
A closer look at Foster Peak (left) and Mammoth Peak (right) in the Vermilion Range. Distant Purcell peaks (including Mount Delphine, Mount Peter, Mount Farnham, Mount Hammond, Mount Atlung, Medenagan Mountain, Jumbo Mountain and Commander Mountain) are visible between the two.
.jpg)
After by-passing two sets of pinnacles (second set visible on the far right), the route makes an abrupt right angle turn following a narrower ridge which juts out over the Bow Valley; the summit is only minutes away now. Click to see larger.
.jpg)
Aurore makes her way along the final ridge, detouring to the right to avoid a large flat rock which is perched atop the ridge in a manner that defies logic.
.jpg)
Looking through boulders towards the first of the Ten Peaks.
.jpg)
Final scrambling to the summit; Although we reached the summit under overcast skies (after a clear start to the day), the visibility was still sufficient to see into the distant Purcells.
.jpg)
The Bugaboo Spires (Snowpatch, Pigeon, Bugaboo and Howser) all visible beyond Rockwall Peak (right). Howser Peak is the glaciated mountain visible in the distant center.
.jpg)
Do you think that she’s happy to be on the summit? All this despite the dull approach, never-ending gully, relentless side-hilling and piles of loose rock! Like I said, some people just don’t learn!
.jpg)
Looking towards Mount Bell’s snow-dusted north face (and the last set of pinnacles which we by-passed on ascent) towards the nearby continental divide and the more distant Vermilion Range in BC.
.jpg)
Continental divide panorama – from left to right: Mount Sir Douglas (distant), Storm Mountain, Mount Assiniboine (distant), Beatrice Peak, Mount Ball, Boom Mountain (foreground), Stanley Peak, Mount Wardle (distant), Mount Verendyre (distant), Mount Haffner, Mount Whymper and Numa Mountain (distant). Click to see larger.
.jpg)
Fatigue Mountain, Citadel Peak and the British Military Group (Mount French, Mount Robertson and Mount Sir Douglas) all visible in the distance beyond nearby Storm Mountain.
.jpg)
A closer look at Storm Mountain.
.jpg)
Distant Mount Assiniboine – the highest peak in the southern Canadian Rockies.
.jpg)
Massive Mount Ball.
.jpg)
Stanley Peak and the spectacular Stanley Glacier.
.jpg)
Mount Verendyre (center left) and Floe Peak (far right) in the distance beyond Mount Whymper. Numa Mountain is visible in the sun between Whymper and Floe.
.jpg)
A chilly day on top!
.jpg)
Looking over Mount Bell’s more technical northeast ridge (center foreground) towards the Bow Valley panorama. Click to see larger.
.jpg)
Massive peaks and scenic valleys towards Lake Louise. From left to right: Mounts Bident and Quadra, Mount Fay, Mount Hungabee (distant), Mount Babel, Mount Lefroy (distant), the tiny Tower of Babel (over Consolation Lakes), massive Mount Temple, Fairview Mountain (distant) and Panorama Ridge.
.jpg)
The lead up to the Valley of the Ten Peaks: Mounts Bident and Quadra overlap on the left while Mount Fay is recognizable on the right with horn-shaped Mount Hungabee flirting with the clouds in the distance.
.jpg)
Mount Hector beyond Panorama Ridge.
.jpg)
Looking across the Bow Valley into Skoki – from left to right: Mount Richardson, Pika Peak, Ptarmigan Peak, Lipalian Mountain, Mount Redoubt, Fossil Mountain, Brachiopod Mountain, Oyster Peak, Anthozoan Mountain, Mount Douglas and Mount St. Bride.
.jpg)
A closer look at Mounts Douglas and St. Bride beyond Bulwark Peak.
.jpg)
Aurore enjoying the view and surprisingly good cell phone reception (who takes calls from work while on a summit – seriously?).
.jpg)
Castle Mountain and O’Brien Lake dominate the panorama to the east while familiar Banff peaks dot the horizon. Click to see larger.
.jpg)
A closer look at O’Brien Lake and the surrounding tarns below a steep snowy face of Mount Bell.
.jpg)
Looking back to the col at which the scrambling began and surveying the alternate ascent route from the Taylor/O’Brien Lake side – looks steep and unpleasant!
.jpg)
A unique perspective on Castle Mountain.
.jpg)
Mount Aylmer (distant center left) dominates the front ranges to the east beyond Castle Mountain.
.jpg)
Looking passed Mount Cory (left) towards the 12 km long Mount Rundle massif over Banff.
.jpg)
Pilot Mountain directly behind Copper Mountain. Kananaskis landmarks Mount Lougheed and Mount Sparrowhawk are also visible in the distance.
.jpg)
After admiring the summit views and signing the register, it was time to retrace our steps and start our long descent.
.jpg)
Admiring the beautiful hanging valley at the base of Chimney Peak (left) and Mount Bident/Quadra (right).
.jpg)
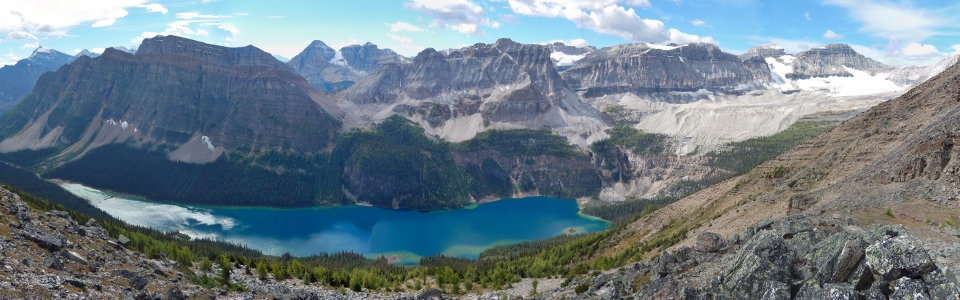
Sadly, Boom Lake is not visible from the summit of Mount Bell (despite the fact that it is visible during almost the entire ascent). Fortunately, once we had returned to the pinnacles below the summit, we were able to see both the vibrant blue lake and the lush green hanging valley above it. Click to see larger.
.jpg)
Rather than detour towards Mount Bell’s open southwest scree slopes, we opted to descend the blocky rib directly below the lower set of pinnacles. This more route proved feasible, however, I’m not sure that we made up any time as progress was slow moving amongst the massive (and sometimes loose) quartzite boulders. Once passed the boulder field, relentless side-hilling resumed – first across loose scree and then across alpine meadows.
.jpg)
Eventually, our side-hilling efforts returned us to the gully which we had originally ascended. Remember how I mentioned that the footing in this gully was firm on ascent? It turns out that the footing is TOO firm. The rock hard sand provided very poor grip and, as a result, the descent of the gully was thoroughly unpleasant – although you can’t tell in this photo, I can promise that Aurore was NOT smiling!
.jpg)
Nearing the bottom of the interminable gully – thank God!
.jpg)
Taking a quick break along the shores of Boom Lake to recharge after the knee-wrenching trip down the gully. Aurore’s face sums up both our feelings at this point. :-P
.jpg)
With the peak and the lake behind us, only 5 km of dull hiking stands between us and our dinner now. Although the trail was easy, we were both bagged. Whereas in the morning, we chatted the whole 5 km in, now we trudged in silence focusing on putting one foot in front of the other. I can only presume that Aurore will be quite sore after Mount Bell. So Aurore: what did you learn?
.jpg)
.jpg)
.jpg)
.jpg)
.jpg)
.jpg)
.jpg)
.jpg)